探索 hexo 生成器

Hexo 的 generators 是如何运作的

Posted by Light on 2024-05-25 | 2.2k words, 2 mins. |

hexo 是如何利用 theme 下的文件生成 html 页面的?
hexo-generator 是如何利用插件的?hexo-generator 生成的结果是什么数据?

为什么我的 archives/index.html 会利用 theme/layout/archive.ejs 生成?
为什么 tags/index.html 没有生成,/tags/tag-a.html 却生成了,并且利用了 theme/tag.ejs 这个模板?

通过源码探索

我们执行 hexo generate 的时候,依赖了博客目录下 node_modules/hexo 里面的代码,那么直接从依赖里面开找。

从 hexo/index.js 开始

生成网站 html 文件需要我们执行 hexo generate。所以直接从 generate 开始看,从 index.js 搜索到 _generate 方法如下:

1
2
3
4
5
6
7
8
9
10
11
12
13
14
15
16
_generate(options = {}) {
if (this._isGenerating)
return;
const useCache = options.cache;
this._isGenerating = true;
this.emit('generateBefore');
// Run before_generate filters
return this.execFilter('before_generate', null, { context: this })
.then(() => this._routerRefresh(this._runGenerators(), useCache)).then(() => {
this.emit('generateAfter');
// Run after_generate filters
return this.execFilter('after_generate', null, { context: this });
}).finally(() => {
this._isGenerating = false;
});
}

这段代码中,我们主要关注this._runGenerators() 和 this._routerRefresh 部分。

1
2
3
4
5
6
7
8
9
10
11
12
13
14
15
16
17
18
19
20
21
22
23
24
25
26
27
28
29
30
31
32
33
34
35
36
37
38
39
40
41
42
43
44
_runGenerators() {
this.locals.invalidate();
const siteLocals = this.locals.toObject();
const generators = this.extend.generator.list();
const { log } = this;
// Run generators
return bluebird_1.default.map(Object.keys(generators), key => {
const generator = generators[key];
log.debug('Generator: %s', (0, picocolors_1.magenta)(key));
return Reflect.apply(generator, this, [siteLocals]);
}).reduce((result, data) => {
return data ? result.concat(data) : result;
}, []);
}
_routerRefresh(runningGenerators, useCache) {
const { route } = this;
const routeList = route.list();
const Locals = this._generateLocals();
Locals.prototype.cache = useCache;
return runningGenerators.map((generatorResult) => {
if (typeof generatorResult !== 'object' || generatorResult.path == null)
return undefined;
// add Route
const path = route.format(generatorResult.path);
// eslint-disable-next-line @typescript-eslint/ban-ts-comment
// @ts-ignore
const { data, layout } = generatorResult;
if (!layout) {
route.set(path, data);
return path;
}
return this.execFilter('template_locals', new Locals(path, data), { context: this })
.then(locals => { route.set(path, createLoadThemeRoute(generatorResult, locals, this)); })
.thenReturn(path);
}).then(newRouteList => {
// Remove old routes
for (let i = 0, len = routeList.length; i < len; i++) {
const item = routeList[i];
if (!newRouteList.includes(item)) {
route.remove(item);
}
}
});
}

我们在 _runGenerators 中可以看到,它将 generator 这个方法类型的变量进行执行,并将返回的结果整合到一起返回。

然后在 _routerRefresh 会对每一个 generatorResult 判断它的三个属性 path, layout 和 data。
我们可以得知,每一个 generator 执行后,返回的结果结构就会包含这三个字段。

接下来我们关注 createLoadThemeRoute() 方法,这个方法就是对应通过 theme 生成 html 的逻辑。

1
2
3
4
5
6
7
8
9
10
11
12
13
14
15
16
17
18
19
20
21
22
23
24
25
26
27
28
29
30
31
32
33
34
35
36
37
38
39
40
const createLoadThemeRoute = function (generatorResult, locals, ctx) {
const { log, theme } = ctx;
const { path, cache: useCache } = locals;
const layout = [...new Set(castArray(generatorResult.layout))];
const layoutLength = layout.length;
// always use cache in fragment_cache
locals.cache = true;
return () => {
if (useCache && routeCache.has(generatorResult))
return routeCache.get(generatorResult);
for (let i = 0; i < layoutLength; i++) {
const name = layout[i];
const view = theme.getView(name);
if (view) {
log.debug(`Rendering HTML ${name}: ${(0, picocolors_1.magenta)(path)}`);
return view
.render(locals)
.then((result) => ctx.extend.injector.exec(result, locals))
.then((result) =>
ctx.execFilter("_after_html_render", result, {
context: ctx,
args: [locals],
})
)
.tap((result) => {
if (useCache) {
routeCache.set(generatorResult, result);
}
})
.tapCatch((err) => {
log.error(
{ err },
`Render HTML failed: ${(0, picocolors_1.magenta)(path)}`
);
});
}
}
log.warn(`No layout: ${(0, picocolors_1.magenta)(path)}`);
};
};

我们可以看到,这里通过遍历 generatorResult 的 layout 字段,这个数组字段,从 theme/layout 文件夹下面匹配我们编写的模板文件。
同时,因为 for 循环中使用了 return,所以会按照 generatorResult.layout 字段数组顺序,在 theme/layout 文件夹下找对应的模板文件,找到第一个就返回。

再看 hexo 中定义的 generater

我们知道创建 generator 的时候,需要在 index.js 中编写以下代码:

hexo.extend.generator.register('', fn);

所以我们直接去 hexo 的 extend 文件夹中寻找 generator 相关的定义:

extend/generator.d.ts
1
2
3
4
5
6
7
8
9
10
11
12
13
14
15
16
17
18
19
20
21
22
23
24
25
26
27
28
29
import Promise from "bluebird";
import type { NodeJSLikeCallback } from "../types";
interface BaseObj {
path: string;
data: any;
layout?: string;
}
type ReturnType = BaseObj | BaseObj[];
type GeneratorReturnType = ReturnType | Promise<ReturnType>;
interface GeneratorFunction {
(locals: object, callback?: NodeJSLikeCallback<any>): GeneratorReturnType;
}
type StoreFunctionReturn = Promise<ReturnType>;
interface StoreFunction {
(locals: object): StoreFunctionReturn;
}
interface Store {
[key: string]: StoreFunction;
}
declare class Generator {
id: number;
store: Store;
constructor();
list(): Store;
get(name: string): StoreFunction;
register(fn: GeneratorFunction): void;
register(name: string, fn: GeneratorFunction): void;
}
export = Generator;

可以看到这里声明了我们使用的 register 方法,以及 GeneratorFunction 的定义。
而 GeneratorFunction 定义的返回值类型 BaseObj 正对应了我们上面发现的 generator 方法的返回值的三个字段:

1
2
3
4
5
interface BaseObj {
path: string;
data: any;
layout?: string;
}

回到具体的 generator 上

dir

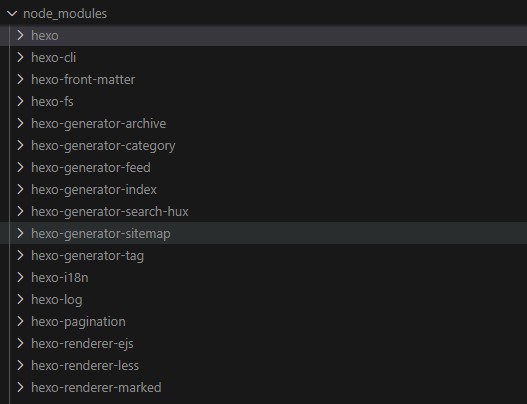
我们可以看到 node_modules 中引入了相当多 hexo-generator-* 的依赖,就是这些依赖帮助我们控制如何生成对应的网页。

我们以 hexo-generator-tag 进行举例,首先在 index.js 中注册 generator:

hexo-generator-tag/index.js
1
2
3
4
5
6
7
8
9
10
11
/* global hexo */
"use strict";

hexo.config.tag_generator = Object.assign(
{
per_page: hexo.config.per_page == null ? 10 : hexo.config.per_page,
},
hexo.config.tag_generator
);

hexo.extend.generator.register("tag", require("./lib/generator"));

然后在 lib 中提供 generator 的方法,并返回带有 path, layout 和 data 的数据。

hexo-generator-tag/lib/generator.js
1
2
3
4
5
6
7
8
9
10
11
12
13
14
15
16
17
18
19
20
21
// ......
pages.push({
path: tagDir,
layout: ["tag-index", "tag", "archive", "index"],
posts: locals.posts,
data: {
base: tagDir,
total: 1,
current: 1,
current_url: tagDir,
posts: locals.posts,
prev: 0,
prev_link: "",
next: 0,
next_link: "",
tags: tags,
},
});

return pages;
// ......

总结生成器生成 html 的流程

首先 hexo 会去 node_modules 下面遍历 hexo-generator-* 的依赖,把这些 generator 都进行加载。
然后 generator 执行,返回带有 path, layout 和 data 结构的数据。
其中 path 对应了生成文件的路径,layout 指定了渲染 theme 下的哪一个模板。
最后 hexo 通过 createLoadThemeRoute 方法将 generator 生成的数据和 theme 下的模板文件结合到一起,生成出最终的 html 文件。

解答开篇的问题

通过上面的代码分析,可以得知前两个比较 common 的问题的答案。
下面我们主要分析下剩下两个具体问题的答案:

  1. 为什么我的 archives/index.html 会利用 theme/layout/archive.ejs 生成?

    解答这个问题需要查看 hexo-generator-achive 的代码:

    1
    2
    3
    4
    5
    6
    7
    8
    9
    10
    11
    12
    13
    14
    // ......
    function generate(path, posts, options = {}) {
    options.archive = true;

    result.push(
    ...pagination(path, posts, {
    perPage,
    layout: ["archive", "index"],
    format: paginationDir + "/%d/",
    data: options,
    })
    );
    }
    // ......

    我们可以看到 hexo-generator-achive 返回数据的 layout 指定了 archive 作为模板文件渲染。所以生成的 archives/index.html 自然利用了 theme/layout/archive.ejs 进行了代码的生成。

  2. 为什么 tags/index.html 没有生成,/tags/tag-a.html 却生成了,并且利用了 theme/tag.ejs 这个模板?

    解答这个问题需要查看 hexo-generator-tag 的代码:

    1
    2
    3
    4
    5
    6
    7
    8
    9
    10
    11
    12
    13
    14
    15
    16
    17
    18
    19
    20
    21
    22
    23
    24
    25
    26
    27
    //......
    // generate tag index page, usually /tags/index.html
    if (config.tag_generator.enable_index_page) {
    tagDir = config.tag_dir;
    if (tagDir[tagDir.length - 1] !== "/") {
    tagDir += "/";
    }

    pages.push({
    path: tagDir,
    layout: ["tag-index", "tag", "archive", "index"],
    posts: locals.posts,
    data: {
    base: tagDir,
    total: 1,
    current: 1,
    current_url: tagDir,
    posts: locals.posts,
    prev: 0,
    prev_link: "",
    next: 0,
    next_link: "",
    tags: tags,
    },
    });
    }
    //......

    我们可以看到,如果 config.tag_generator.enable_index_page 为空或者没有定义,就不会生成 path 的值是 /tags/index.html 。

    然后再查看生成 /tags/tag-a.html 的代码:

    1
    2
    3
    4
    5
    6
    7
    8
    9
    10
    11
    12
    13
    14
    15
    const pages = tags.reduce((result, tag) => {
    if (!tag.length) return result;

    const posts = tag.posts.sort(orderBy);
    const data = pagination(tag.path, posts, {
    perPage: perPage,
    layout: ["tag", "archive", "index"],
    format: paginationDir + "/%d/",
    data: {
    tag: tag.name,
    },
    });

    return result.concat(data);
    }, []);

    其中 layout 数组中,第一个指定了 tag 作为模板,所以只要在我们 theme/layout/ 文件夹下面找到了 tag.ejs 就会使用该文件去渲染具体的 tag 页面。


如果这篇文章对你有帮助,那么不妨?