作为一名 INFJ-A,我一直渴望拥有一个可以记录分享自己想法和作品的平台。经过一番探索,我最终选择了使用 Hexo 作为我的博客搭建工具。Hexo 以其简洁优雅的风格和强大的功能吸引了我,并帮助我顺利搭建了自己的博客。
在搭建博客的过程中,我遇到了一些需要解决的细节问题,也对一些默认配置进行了个性化调整。本文将记录我的搭建过程,并分享一些个人经验和建议,希望能对想要使用 Hexo 搭建博客的朋友有所帮助。
——上面的内容由 AI 生成,万事开头难,哈哈哈
搭建博客
环境准备
1 | # 全局安装 hexo 命令工具 |
部署到 Github Page
- 在 Github 上创建
<你的 GitHub 用户名>.github.io的仓库 - 将 Hexo 文件夹中的文件 push 到储存库的默认分支
- 在储存库中建立
.github/workflows/pages.yml,并填入下面内容,再推送到 Github 上
1 | name: Pages |
个性配置
主题配置
这里我选择的是 hux 的主题,但它是用 jekyll 构建的。
所以我们就在 Github 上找到了一个把 hux 移植到 hexo 的主题。
然后把这个仓库 fork 到自己的仓库里面做定制化。
为博客添加主题
1
2
3
# 我把主题 fork 到了我自己的仓库 https://github.com/tobelight/hexo-theme-hux
# 添加主题到我的 blog 中
$ git submodule add https://github.com/tobelight/hexo-theme-hux themes/hexo-theme-hux在 config 中修改主题。
_config.yml 1
theme: hexo-theme-hux
添加 less-renderer
因为主题使用了 less 作为样式,所以需要添加依赖到 package.json 中。
package.json 1
2
3
4
5{
"dependencies": {
"hexo-renderer-less": "^4.0.0"
}
}1
2
3
4
5
6# 安装依赖
$ npm install
# 清理之前生成的资源
$ hexo clean
# 执行 server 以本地查看效果
$ hexo server
支持资源文件
1 | marked: |
生成 About 页面
1 | # 生成 about 页面 |
默认生成的 index.md 文件中没有指定 layout: about, 需要手动添加,
否则会导致 about 页面无法正常显示。
添加评论功能
参考 https://giscus.app/zh-CN
按照流程生成脚本,然后添加到 theme 中。
- 在用户 Setting -> Application 中添加 giscus 应用,可指定权限
- 在仓库的 Setting 中,找到 Discussions 并进行勾选
- 在 giscus 页面中,获取最终脚本
- 依据需求把脚本添加到 theme 的对应位置上
在这个页面上,任何人指定仓库就能获取到这段脚本,没有前置条件和权限控制。
这会导致任何人都可以把这个脚本用在任何一个网站上。
基于安全性考虑,我们还需要配置只有我们的网站才能使用这个脚本。
参考 https://github.com/giscus/giscus/blob/main/ADVANCED-USAGE.md
我们需要创建并配置 giscus.json 到仓库中,让 giscus 只允许我们配置的源使用。
字数统计
使用 https://github.com/theme-next/hexo-symbols-count-time
- 安装字数统计的依赖
npm install hexo-symbols-count-time - 在 header 中添加以下脚本
<%- symbolsCount(page) %> words, <%- symbolsTime(page) %>
问题排查
乱七八糟的问题整合。
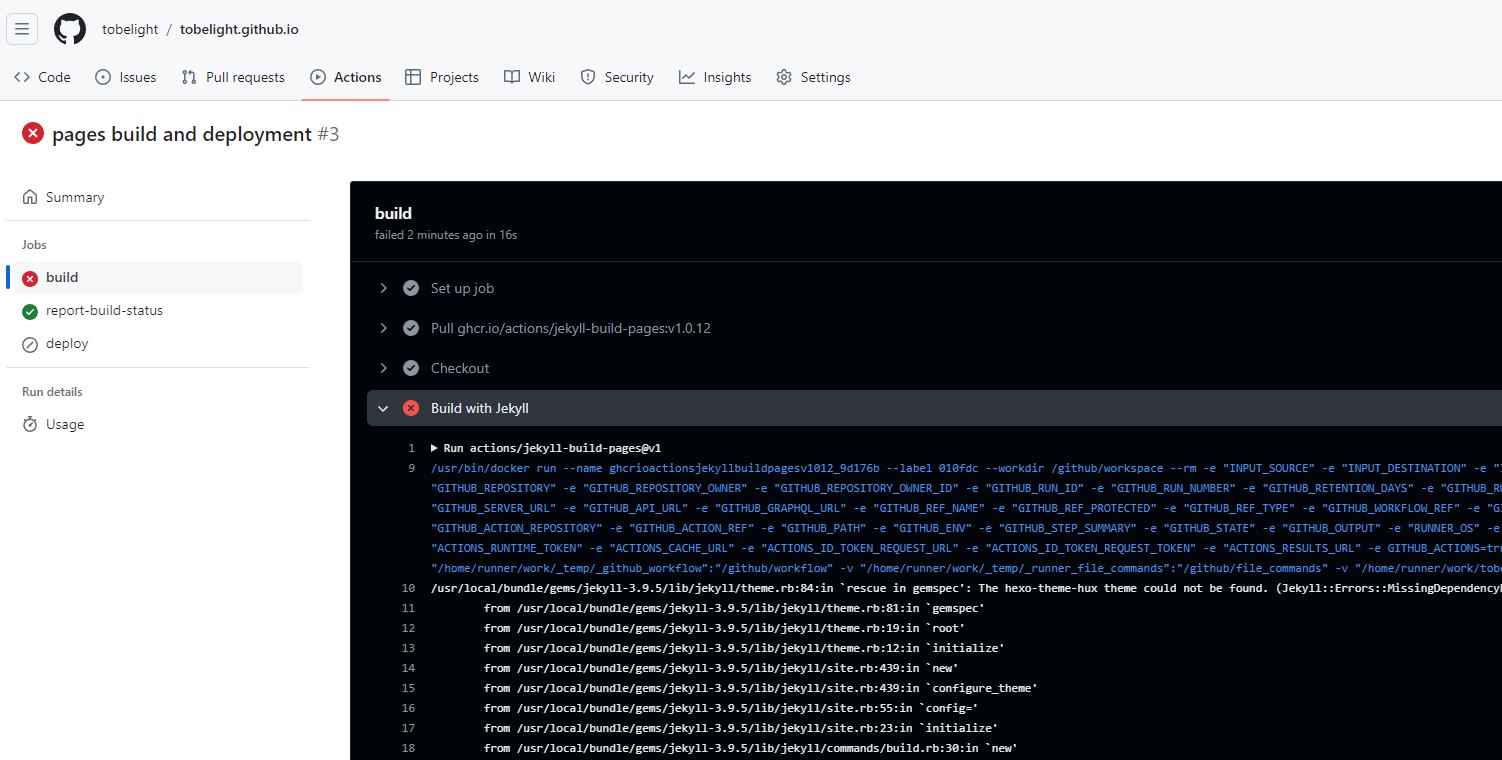
部署 hexo 却出现 jekyll 错误
参考 issues: https://github.com/orgs/community/discussions/106846
参考 doc:https://docs.github.com/en/pages/getting-started-with-github-pages/about-github-pages#static-site-generators
添加空文件 .nojekyll 到根目录。
配置支持资源文件时,markdown 语法没有生效
参考 issues:https://github.com/hexojs/hexo-renderer-marked/issues/281
hexo version: 7.2.0
hexo-renderer-marked: 6.3.0
目前 hexo-renderer-marked 没有成功支持 hexo 7.2.0,需要降级到7.1.1。
1 | { |
VS Code 修改 scaffolds 时,无法保存正确的变量
VS Code 修改 scaffolds 后,由于 prettier-vscode 插件的存在,保存时 {{ date }} 会变成 { { date } }。
主要是因为 prettier.bracketSpacing 这个配置项会在 { char } 中自动添加空格。
然后这个属性只允许配置成 true 和 false,true 的时候会自动添加空格,false 的时候会自动删除空格变成 {{char}} 的形式。
这两种情况都不符合我的期望——配置成 {{ date }} 的格式。
所以我添加了 .prettierignore 文件到根目录中,把 scaffolds 路径添加到该文件中,不进行格式化操作。
其他
编写 Hexo Theme 需要的属性以及方法都在官方文档中。
支持的变量
支持的函数

- 本文链接: https://tobelight.github.io/2024/hello-world/
- 版权声明: 本博客所有文章采用 BY-NC-SA 许可协议。